Signed in as:
filler@godaddy.com

The first step in restoring a hickory golf club is to thoroughly assess its condition.
Begin by examining the clubhead, looking for signs of rust, pitting, cracks, or looseness around the hosel. Surface rust and patina are normal, but deep corrosion or structural damage may compromise playability or require specialist attention.
Next, inspect the shaft, gently rolling it on a flat surface or sighting down its length to check for warping or cracks. A slight natural curve may be acceptable, but significant bending or splintering should be addressed before proceeding. The grip also requires close inspection — original leather grips often dry out, crack, or unravel with age. Some may be salvageable with conditioning, but many will need to be replaced.
Finally, look at the overall finish of the club, taking note of flaking varnish, worn stain, or other cosmetic wear that can be improved with refinishing. At this stage, your goal is to identify any structural or aesthetic issues before restoration begins, ensuring that the club is a good candidate for repair and, ultimately, play.
The next step is to carefully remove the clubhead from the shaft.
Begin by identifying the small metal pin that runs horizontally through the hosel—the part of the head that joins the shaft. This pin secures the head in place and must be removed before any attempt is made to detach the two components.
Using a small punch and hammer or a fine drill bit, gently tap or drill the pin out, taking care not to split or damage the hickory wood. With the pin removed, the head may be removed by hand. If head remains firmly attached, apply gentle heat to the hosel using a heat gun or hairdryer to soften the old adhesive within. It’s important to keep the heat controlled and avoid open flames, as hickory is vulnerable to scorching. Once the glue has loosened, you can begin to slowly twist and pull the clubhead away from the shaft. The key here is patience and precision — a rushed removal can cause irreversible damage to both parts.
With the clubhead now separated, the next phase involves cleaning and removing any rust or surface contaminants.
Start by gently washing the head using a soft cloth and a mild soap solution to remove built-up dirt, grease, or old polish. Avoid abrasive cleaners at this stage — the goal is to clear away surface grime without damaging any original markings or finishes. Once clean and dry, inspect the metal closely for signs of rust. For light corrosion, use fine-grade steel wool (0000) or a brass wire brush to gently buff the affected areas, working with the natural lines of the head to maintain its original shape.
In cases where the rust is more stubborn, you may use a metal-safe rust remover or a home solution of white vinegar and bicarbonate of soda applied with care. After rust removal, it's time to restore a smooth finish.
Apply a small amount of metal polish using a clean cloth and work it into the surface using slow, circular motions. This will bring out the clubhead’s natural shine while adding a light layer of protection. However, be careful not to over-polish — part of the charm of a hickory club lies in its aged patina, and preserving these historic features is just as important as improving performance.
With the clubhead cleaned and set aside, attention now turns to the hickory shaft — the heart of the club’s character and performance.
Begin by checking for any warping or bends. If the shaft shows a gentle curve, it can often be corrected by applying light, even heat using a heat gun while gently straightening the wood by hand.
Once the shaft is aligned and cool, the next step is to prepare the surface. Lightly sand the entire length using fine-grit sandpaper to remove old varnish, stains, or any rough spots, being careful not to thin the shaft or damage any original stamping. After sanding, use a clean cloth to wipe away dust and assess the grain. If desired, apply a wood stain to enhance or match the original colour — although this step is optional and should be approached with care if authenticity is important.
The key part of this process is oiling: multiple coats of boiled linseed oil should be applied to rehydrate the wood and restore flexibility, allowing each coat to soak in and dry before the next is added.
Finally, once the desired tone and sheen are achieved, seal the shaft with a thin layer of shellac to protect it from moisture and further wear. Regular maintenance with linseed or tung oil will help preserve the shaft’s integrity and ensure it remains playable for years to come.

Once both the shaft and clubhead have been restored, it’s time to reassemble the club with care and precision.
Begin by preparing the hosel and the tip of the shaft — both should be clean, dry, and free of old adhesive. Apply a quality epoxy adhesive inside the hosel and lightly coat the tapered end of the shaft, ensuring full contact when the two are joined. Gently twist the clubhead onto the shaft until it is properly aligned and seated at the correct angle. Be sure to wipe away any excess adhesive before it sets. Allow the epoxy to cure fully according to the manufacturer’s instructions.
Once the adhesive has hardened, locate the original pin hole in the hosel. Drill through the shaft at this point, if necessary, and insert a new metal pin to secure the connection. This can be a small brass or steel pin, trimmed and filed flush with the outer hosel once inserted.
As a final (and optional) step, you may choose to wrap whipping thread around the neck of the shaft just above the clubhead — not only does this add a layer of visual authenticity, but it also reinforces the joint and helps prevent future splitting or separation.

The final step in the restoration process is replacing or restoring the grip — a crucial component for both comfort and control.
Start by carefully removing the old leather grip. Use a sharp knife or scalpel to cut along the seam, working slowly to avoid damaging the wooden shaft beneath. Once removed, clean the shaft thoroughly to remove any old glue, leather residue, or oxidation.
To prepare for the new grip, wrap the shaft in friction tape or double-sided grip tape to build up the grip area to your desired thickness — this step also helps the new grip adhere securely.
Select a high-quality strip of leather and cut to length. Cut a 3" diagonal taper at one end of the strip. Attach the thinnest point to the top of the club shaft and begin wrapping it tightly and evenly along the shaft, working downwards. Ensuring that teh edges of the leather strip meet each other without gaps or overlaps.
Secure both ends with traditional whipping thread or fine twine, tied off neatly to complete the look. Take your time here — whipping thread can be tricky. Ensure the thread is secured under
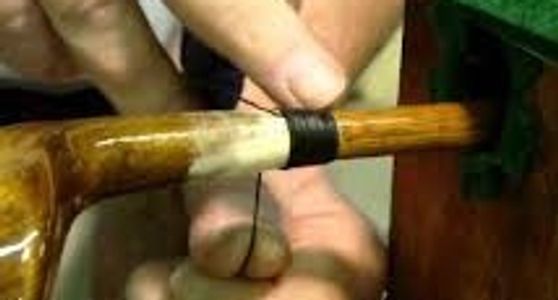
To apply whipping thread, begin by selecting a durable, waxed linen thread, such as Crawfords, known for its ease of use and reliability.
Start by cutting a length of this thread, approximately 8 inches long, and form it into a loop. Position this loop along the area of the shaft where the whipping will be applied, typically just above the clubhead on the hosel. Next, take the working end of the thread and begin wrapping it tightly around the shaft, ensuring each wrap is snug and lies neatly beside the previous one, covering the loop as you proceed.
Continue this process until you've covered the desired length of the shaft. Once complete, thread the working end through the loop you initially laid down. Then, gently pull both ends of the loop to draw the working end back underneath the wrapped section, securing it firmly in place.
Finally, trim any excess thread close to the whipping to achieve a clean and professional finish.